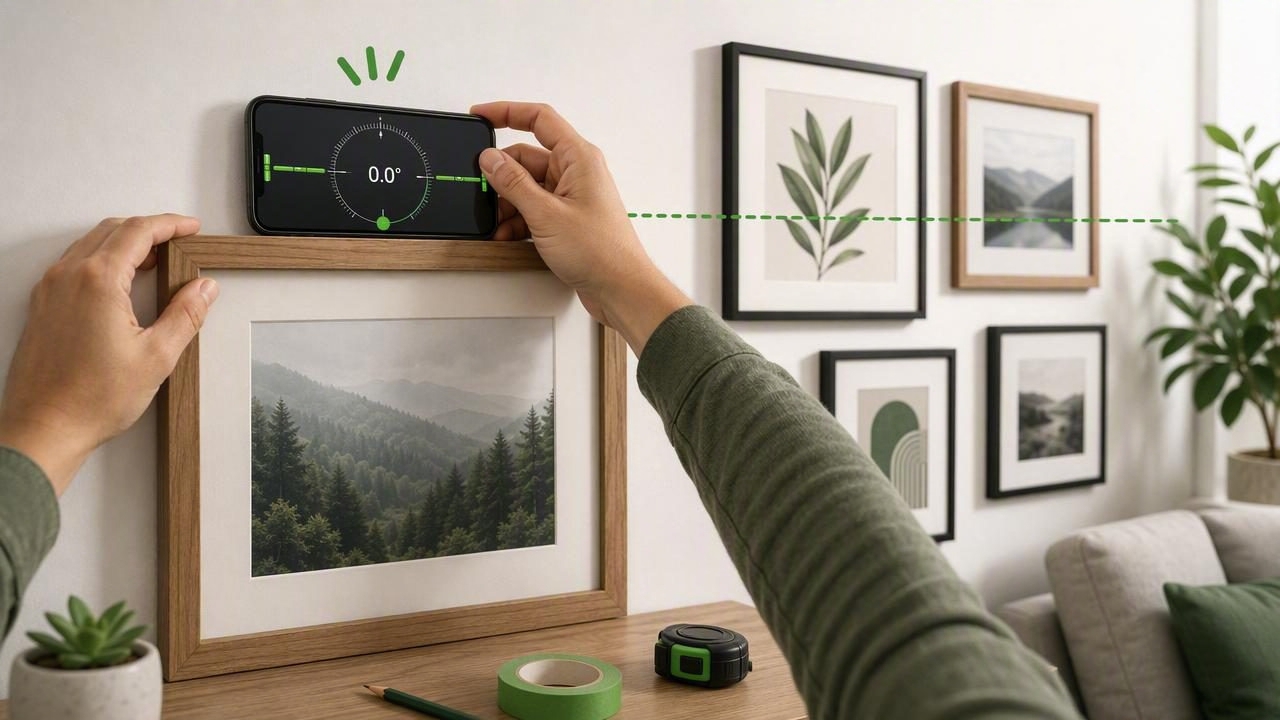
A crooked picture frame can make an entire room feel “off,” even if everything else is tidy. The good news: you don’t need a long spirit level or a laser to get clean, repeatable results. If you have an iPhone, you can hang pictures straight using phone angle gauge techniques that rely on your device’s motion sensors for precise leveling.
This guide walks you through a reliable workflow—calibration, wall marking, hanging hardware, and final alignment—plus troubleshooting for frames that keep shifting out of level.
Why a phone angle gauge works for picture hanging
An angle gauge (often called an inclinometer) measures tilt relative to gravity. For hanging frames, you’re mostly chasing one thing: 0.0° along the top edge of the frame. Because your phone can read tiny changes in tilt, it can replace (or supplement) a bubble level for quick alignment—especially useful for small-to-medium frames and gallery walls.
Tip: When people say a frame is “level,” they usually mean it looks level. A phone angle gauge lets you get truly level first, then fine-tune for optical illusions caused by ceilings, trim, or nearby furniture.
What you’ll need
- iPhone with an angle gauge/level tool (works offline, so it’s also great in basements, workshops, and remote sites)
- Pencil (or low-tack painter’s tape for marking)
- Measuring tape (optional but helpful for consistent spacing)
- Picture hooks (or wall anchors appropriate to your wall type)
- Hammer or screwdriver
- Rubber bumpers (optional; prevents wall scuffs and reduces frame drift)
Step 1: Calibrate your phone angle gauge (fast, but important)
Calibration is the difference between “pretty straight” and repeatably straight.
- Find a stable reference surface: a kitchen countertop, a sturdy shelf, or a known-flat table.
- Open your angle gauge and place the phone flat on the surface. Wait a second for the reading to settle.
- Zero or calibrate if your tool offers it. If not, note the baseline (for example, +0.2°) and compensate mentally.
- Flip the phone 180° in the same spot. Ideally, the reading should match (or mirror) closely. If it changes a lot, try another surface or re-zero.
Why the flip test? It helps catch uneven surfaces and confirms your reading is stable enough for fine alignment.
Step 2: Choose the most reliable leveling point on the frame
Not all frames are built perfectly square, and some have beveled edges that make placement tricky. Pick one of these contact points:
- Flat top edge: best option if the frame has a flat, wide top.
- Glass surface: works if the glass is flush and the phone won’t slip.
- Back top rail: often the most consistent for ornate frames; you’ll align from the back, then flip the frame forward.
Quick stability trick
If your phone slides on a glossy frame, place a thin microfiber cloth between the phone and frame. It improves grip without changing the angle meaningfully.
Step 3: Mark a true-level reference on the wall (optional but powerful)
For gallery walls, or if your frame tends to drift, a wall reference line makes alignment faster and more consistent.
- Apply a strip of painter’s tape where the top of the frame will land.
- Hold the phone against the tape line (or a straightedge pressed to the wall) and adjust until it reads 0.0°.
- Draw a light pencil line along the tape edge, or use the tape itself as the “level line.”
This reference is especially helpful when you’re hanging multiple frames and want the top edges to line up perfectly.
Step 4: Hang the frame using one of two proven methods
Method A: Single hook (fastest for small-to-medium frames)
- Decide the final height (common rule: frame center around eye level).
- Install the hook using the appropriate angle/anchor for your wall type.
- Hang the frame and let it settle.
- Place the phone on the frame (chosen contact point) and rotate the frame until the gauge reads 0.0°.
- Add rubber bumpers to the lower corners if the frame frequently gets bumped or slowly rotates.
Method B: Two points (best for wide frames and gallery walls)
Two hooks (or two nails/screws) reduce rotation and keep wide frames from drifting.
- Measure the distance between the two hanging points on the frame (D-rings are ideal here).
- Transfer that distance to the wall using a tape measure and light marks.
- Install both hooks, hang the frame, and confirm with your phone angle gauge.
- Micro-adjust by nudging one side slightly or re-seating the hardware until you hit 0.0°.
Step 5: Fine-tune so it looks level (optical alignment)
Sometimes a frame reads 0.0° but still looks wrong due to visual references (ceiling lines, crown molding, sloped floors, or a nearby window). Use this practical sequence:
- Confirm true level with the phone first.
- Step back 6–10 feet and check alignment with nearby lines (mantel, headboard, cabinet tops).
- Adjust in tiny increments (often within ±0.3°) if the room’s geometry is misleading.
Common picture-hanging scenarios (and the best approach)
| Scenario | Best hardware | Best leveling method | Pro note |
|---|---|---|---|
| Small frame (under ~12 in wide) | Single hook | Phone on top edge to 0.0° | Add bumpers if it rotates easily |
| Wide frame (over ~24 in wide) | Two hooks or D-rings | Level after hanging, then lock in | Two-point hang reduces drift |
| Gallery wall (multiple frames) | Mixed, but plan spacing | Create a wall reference line | Use tape guides for consistent tops |
| Frame with wire hanger | Hook rated for weight | Level the frame, then reduce wire slack | Wire can “walk” over time without bumpers |
Troubleshooting: why your frame won’t stay level
1) The hook is off-center relative to the frame’s center of mass
If the hanging point isn’t centered, gravity will rotate the frame. Fix by switching to a two-point hang (D-rings) or moving hardware so the weight is balanced.
2) The hanging wire is too loose
Loose wire allows the frame to shift when bumped. Tighten the wire, use a wire tightening method, or switch to D-rings for stability.
3) The wall surface is slick or the frame corners slide
Add rubber bumpers to the lower corners. This is one of the highest-impact fixes for “mysteriously crooked” frames.
4) Your phone reading feels inconsistent
- Re-calibrate on a stable surface (repeat the flip test).
- Remove thick phone cases that wobble on edges.
- Let the reading settle for a second before adjusting.
A repeatable workflow for a clean gallery wall
If you’re hanging 3+ frames, consistency matters more than perfection on any single piece. Try this simple sequence:
- Pick a “datum” line: decide whether you want all tops aligned, all centers aligned, or the bottom edges aligned.
- Lay out spacing with tape: mark gaps (for example, 2 inches between frames).
- Hang the first frame and level it using the phone angle gauge.
- Use the first frame as the visual anchor: level and align the next frames to it, not to the ceiling.
- Re-check everything at the end: small cumulative errors are common.
Optional: log angles during setup (useful for tricky rooms)
If you’re dealing with a room that “looks” off-level, you can record the angle you ended up using so you can match it across the wall. Here’s a tiny pseudo-workflow you can adapt in any notes app or automation tool:
# Angle log (pseudo)
# Goal: record the final visual angle for each frame

FrameName: "Living Room Center"
TrueLevelAngle: 0.0
FinalVisualAngle: -0.2
Notes: "Matches mantel line; room floor slopes slightly"
This helps when you come back later to add new frames and want everything to match the established look.
Safety and wall-care reminders
- Use anchors when hanging anything heavier than a light frame on drywall.
- Check for utilities before drilling near outlets, switches, or plumbing runs.
- Protect the frame and wall with bumpers and gentle marks (tape beats deep pencil lines).
Bring it all together
To hang frames confidently, focus on a repeatable process: calibrate your phone, pick a stable contact point on the frame, level to 0.0°, and add simple hardware tweaks (two-point hanging and bumpers) to keep it from drifting. Once you’ve done it this way, you’ll be able to straighten a picture in seconds—without guessing.
If you prefer an offline, multi-tool approach on iOS, a professional measurement app like Level Tool can combine an angle gauge with other field-friendly tools in one place.
