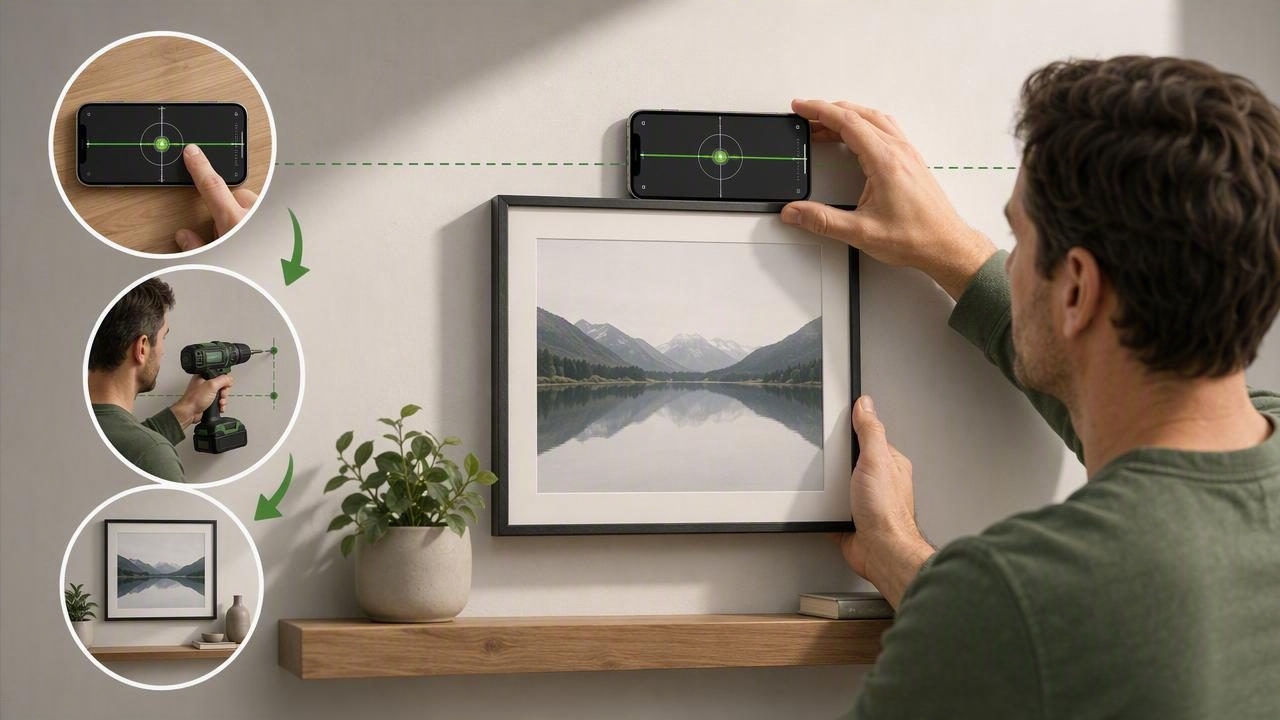
Learning how to get faster DIY installation with a calibrated iPhone level can eliminate one of the most common causes of rework: installing something that looks straight at first, only to discover it is visibly crooked after stepping back. Whether you are hanging shelves, fitting curtain rods, mounting a television, installing cabinet hardware, or aligning tile, a properly calibrated digital level can help you work with greater speed and confidence.
Your iPhone contains motion sensors that can detect tilt and orientation. When used through a reliable measurement app, those sensors can provide useful level readings without requiring you to carry a separate spirit level for every small job. The key is not simply opening a level screen and trusting the first number you see. Accurate, efficient results depend on calibration, stable positioning, and a repeatable installation process.
This guide explains how to prepare your phone, use an iPhone level effectively, avoid common mistakes, and turn level checks into a faster part of your DIY workflow.
Why Calibration Makes DIY Installation Faster
Calibration aligns the app's reading with a known level surface or reference position. If your phone's measurement tool has not been calibrated recently, even a small error can create problems. A shelf that is only one or two degrees off may still be noticeable, especially next to windows, countertops, ceiling lines, or other fixed architectural features.
Taking a minute to calibrate before a project can save considerably more time later. It reduces the need to loosen screws, refill holes, reposition brackets, and repaint damaged walls. Calibration is particularly valuable when you have changed phone cases, updated your device, switched apps, or dropped your phone.
| DIY Task | Why Accurate Leveling Matters | Time Saved by Calibrating |
|---|---|---|
| Floating shelf installation | Prevents objects from rolling or looking uneven | Avoids re-drilling bracket holes |
| Curtain rod mounting | Keeps curtains hanging evenly on both sides | Reduces repeated height adjustments |
| Wall-mounted TV | Creates a balanced viewing setup | Prevents remounting a heavy bracket |
| Picture gallery wall | Maintains consistent visual alignment | Limits individual frame corrections |
| Tile or backsplash work | Helps establish a straight reference row | Reduces layout and spacing errors |
Prepare Your iPhone Before Measuring
Before starting an installation, make sure the phone itself can sit flat against the surface or tool you are measuring. A thick protective case, camera bump, pop socket, ring holder, or uneven accessory can interfere with readings. You do not always need to remove the case, but you should understand whether it prevents the phone from resting evenly.
For the best results, use a flat section of the device rather than balancing it on the camera area. If you are checking a narrow bracket or a small ledge, place a straight scrap board, metal ruler, or longer level surface across it first. Then set the iPhone on that reference surface. This gives the sensors a more stable plane to measure.
Quick pre-installation checklist
- Charge your iPhone or ensure sufficient battery for the project.
- Clean the back of the phone and the surface being checked.
- Remove accessories that make the phone sit unevenly.
- Open an offline measurement tool before climbing a ladder or entering a low-signal area.
- Choose a stable, reasonably flat reference surface for calibration.
- Keep a pencil, tape measure, drill, fasteners, and painter's tape within reach.
Organizing these items first is a simple way to avoid breaking your concentration midway through the task. Faster installation is often less about rushing and more about reducing interruptions.
How to Calibrate an iPhone Level Correctly
Calibration methods vary slightly by app, but the principle is the same: establish a trusted baseline and verify it. If you own a traditional bubble level that you know is accurate, it can be a useful comparison tool. Otherwise, use a sturdy countertop, workbench, or other surface that you have checked previously.
- Place the iPhone on a stable reference surface. Avoid soft surfaces, warped boards, or areas with debris underneath the phone.
- Open the level or inclinometer feature. Wait a few seconds for the reading to stabilize.
- Follow the app's calibration prompt. This may involve setting the current position as zero or confirming a flat orientation.
- Rotate the phone 180 degrees. Put it back in nearly the same spot and compare the result.
- Check for consistency. If the reading changes noticeably after rotation, recalibrate or use another reference surface.
- Test against a known level. Compare the digital reading with a quality spirit level if precision is important.
The 180-degree test is especially useful because it helps expose errors caused by the surface, the phone position, or calibration drift. For routine home improvement tasks, consistency matters more than chasing tiny fractions of a degree.
Practical rule: Calibrate at the beginning of a project, then recheck after a drop, a major change in temperature, or any time the readings seem unexpected.
A Faster Workflow for Level DIY Installations
The most efficient installers do not level an item only after it is fully attached. Instead, they use a sequence that catches alignment issues before they become permanent. This approach works for shelves, hooks, wall rails, mirrors, cabinets, and many other fixtures.
1. Mark the intended height
Start by measuring the desired height from the floor, countertop, or another fixed point. Make a small pencil mark where each bracket, screw, or mounting point will go. For a long installation, mark both ends rather than relying on one point.
2. Create a level reference line
Hold a straight board, ruler, or mounting rail between the two marks. Place your calibrated iPhone level on the straight edge and adjust until the display indicates level. Lightly trace the edge or add aligned marks with a pencil. Painter's tape can also make a clean temporary guide line on finished walls.
3. Confirm before drilling
Before making holes, check the reference line a second time. This takes seconds and prevents the frustrating situation of discovering that a bracket was marked from an uneven surface. If you are installing into drywall, locate studs or choose suitable anchors before committing to the layout.
4. Install one side first
For shelves, rods, rails, and other two-point fixtures, fasten one side loosely at first. This gives you room to make a small adjustment on the second side. A fully tightened first bracket can make correction more difficult.
5. Set and verify the final position
Place the fixture or a straight reference board across the installed supports. Use the iPhone level to check both horizontal level and, when relevant, front-to-back tilt. Once the reading is correct, tighten all screws and perform one final check.
This process is faster than attempting to measure every component independently. It also helps ensure that the finished installation looks aligned from normal viewing distance.
Use the Right Measurement Mode for the Job
Many iOS measurement tools provide more than a standard horizontal bubble level. Choosing the correct mode helps you work more efficiently and reduces mental math.
| Measurement Mode | Best Use | Helpful Reading |
|---|---|---|
| Horizontal level | Shelves, frames, rods, wall rails | 0° or centered bubble |
| Vertical level | Posts, trim, door frames, artwork edges | 90° or plumb indicator |
| Inclinometer | Ramps, drainage, stair components | Angle in degrees |
| Dual-axis level | Appliances, tables, equipment platforms | Side-to-side and front-to-back tilt |
For example, installing a washing machine requires more than checking one direction. A dual-axis reading can reveal whether the appliance is tilted forward, backward, left, or right. In contrast, a curtain rod usually needs a simple horizontal reading across its length.
Common Errors That Slow Down DIY Projects
Even the best digital level cannot compensate for poor setup. Avoid these frequent errors to get faster, more dependable results.
- Measuring directly on an uneven phone case: If the case rocks or contacts the wall unevenly, the reading can be misleading.
- Using a short surface for a long installation: A small level check on one bracket does not guarantee the full shelf or rod is level.
- Ignoring wall irregularities: Textured walls, bowed plaster, and uneven tile can affect how a phone sits.
- Drilling before checking the full layout: Verify both mounting points and the reference line before making holes.
- Relying on visual alignment alone: Floors, ceilings, and trim are not always level, even when they appear to be.
- Forgetting to recalibrate: A quick calibration check is far quicker than correcting a finished installation.
Also remember that “level” and “looks level” can occasionally differ. In older homes, a truly level shelf may appear slightly off relative to a sloping ceiling or floor. In those cases, decide whether structural accuracy or visual alignment matters more for the specific project.
When an iPhone Level Is Most Useful
An iPhone level is ideal for quick layout checks, small- to medium-size installations, troubleshooting, and projects where portability matters. It is especially convenient when you are working alone, moving between rooms, or completing a repair outdoors where carrying multiple tools is inconvenient.
For highly regulated construction work, major structural installations, or tasks requiring certified tolerances, use professional-grade equipment and follow local building requirements. A mobile level is an excellent practical aid, but it should complement—not replace—specialized instruments where precision standards demand them.
Make Accurate Installation a Repeatable Habit
The fastest DIY workflow is repeatable: calibrate, mark, create a reference line, verify before drilling, and check the completed installation. Once this sequence becomes routine, you will spend less time correcting small mistakes and more time finishing projects cleanly.
An offline iOS app is particularly useful because measurement features remain available in garages, basements, workshops, trails, and other locations with unreliable connectivity. For homeowners and professionals who want several practical tools in one place, Level Tool offers level, ruler, compass, and other sensor-based measurements without requiring a subscription.
With a calibrated iPhone level and a methodical approach, everyday installation jobs become quicker, straighter, and far less likely to require a second attempt.
Put the workflow into practice
Follow the measure angle iphone guide before an installation: calibrate against a reliable reference, use the same contact edge and repeat the reading before fixing the object permanently.
See Bubble Level & Angle Finder on the App Store for current availability and details.
